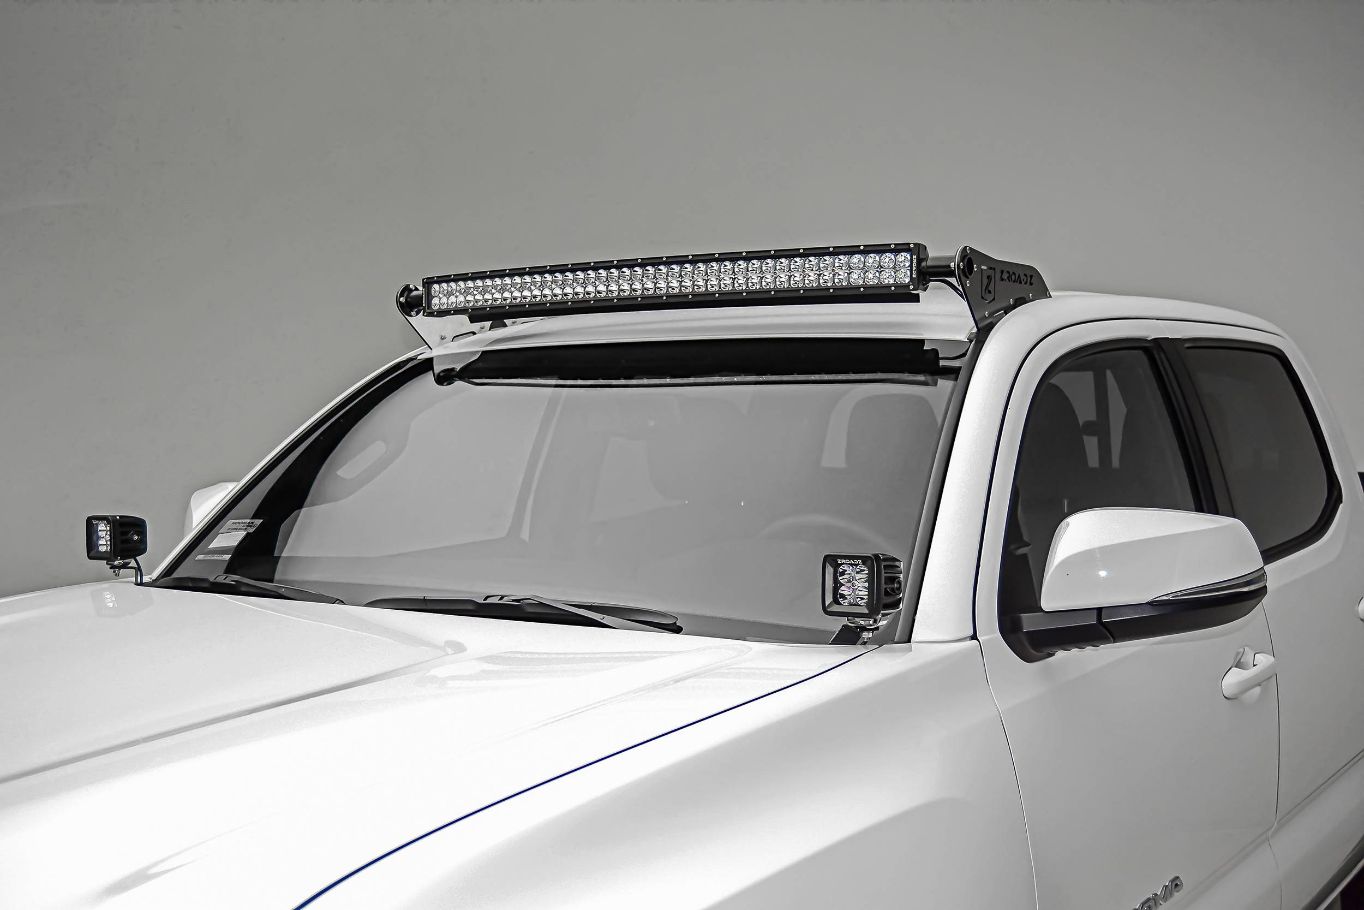
Driving at night or inclement weather can be made more illuminated by installing a light bar on your car. You might prefer to use a toggle switch over the switches that many light bars have as they come with them.
To install a light bar, you must first understand how to wire a toggle switch. You must first determine the current draw of your light bar. A toggle switch typically has two terminals: a positive terminal and a negative terminal.
Please take your time reading this article if you want to learn how to wire a light bar to a toggle switch.
What Is A Toggle Switch?
An appliance with one or more levers for establishing or severing the connection is known as a toggle switch. By opening the window in between, the next terminal is connected when the toggle is flipped up. It disconnects from that terminal when you flip it down.
Consider the single-pole double-throw (SPDT) toggle switch is shown in the illustration to the right as an illustration. When the toggle is flipped up (connected), two terminals, A and B, are visible and connected.
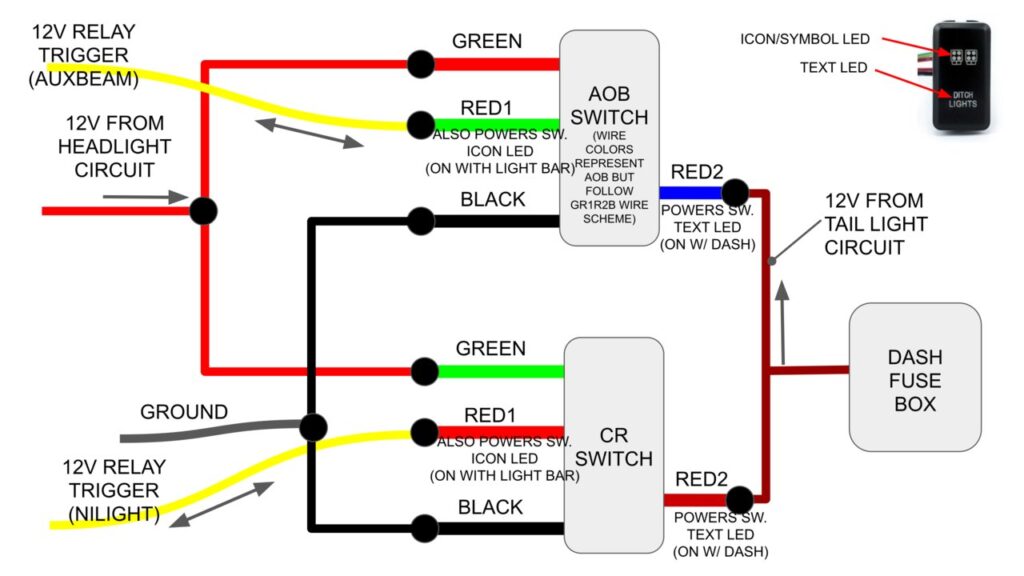
Relays are required if you want to use your toggle to control multiple circuits. By using a relay, you can switch a high current circuit, such as the lights in your car, using a low current signal, such as 5 volts DC.
Before Installation, Test Your Light Bar!
Make sure your lightbar is operational before you start the installation. Connecting it to the battery of your car will enable you to do this. Before installing something flawed, you can exchange it if it doesn’t work.
A relay is the starting point for some crucial wiring advice. They typically have a higher load capacity than switches, preventing overheating. Since they have a smaller voltage drop, you can use multiple lights simultaneously when using them with a single control switch.
Also recommended is the use of a fuse with the appropriate amp rating for some low-cost electrical system protection for your car. A pound of treatment is worth an ounce of prevention.
How Do I Connect A Light Bar To A Toggle Switch?
Step 1: Determine Your Wires And Wire Harness Length
Determine the color of the wires in the wiring harness of your light bar first. For a list of typical colors used in car stereo wiring, see the diagram below. Once you’ve selected your wire color, use the wire cutters/strippers to strip approximately ¼” off of each end of the wire harness.
The toggle switch should be held in a vise grip with the switch’s bottom facing up after both ends have been stripped. It won’t suffer damage during the following stage if you do this! While you’re crimping on your wires, a vise grip will keep them from slipping or bumping.
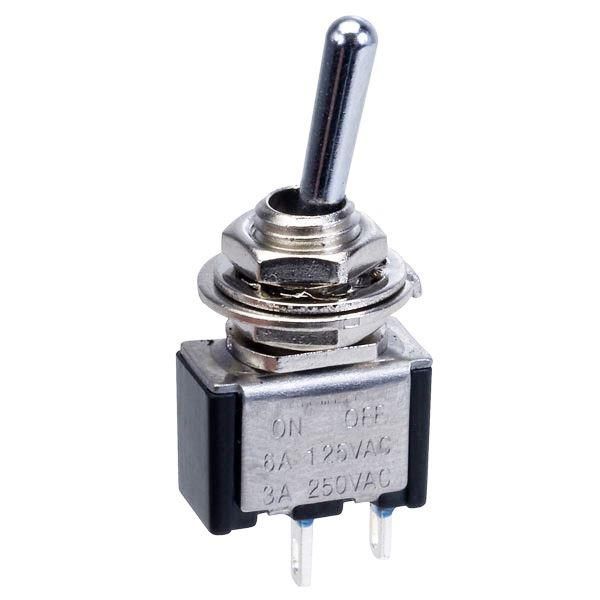
Now, place a red wire and a black wire on either side of the toggle switch, as shown below, using the wires from your light bar wire harness.
Step 2: Use A Relay Over Switch
By cutting one of the black wires and leaving the red wire intact, we can make your switch work with a relay and protect it.
Now strip 1/4″ off both ends of your remaining black wire from your light bar harness and also strip ¼” off either end of the red wire coming from your toggle switch (the same color as you used for step 1).
Once all wires have been stripped, take each end and tightly twist it. In order to successfully solder, make sure there is no space between the solder points.
Make sure the solder melts quickly and easily if you want to connect two metal pieces with it. If it doesn’t, either your iron isn’t hot enough, or you’re not applying enough heat. 5 seconds after applying heat, the solder ought to melt into the connection.
If you don’t want to solder, you can also use a crimping tool; just be sure to cover the connection with heat shrink tubing afterward to protect it from the elements.
Step 3: Choose A Fuse
You must first choose the proper size from the available options before you can install a new fuse. After choosing the fuse, cut it to the correct length with wire cutters or side cutter pliers. When cutting the fuse, exercise caution because it may contain metal fragments that, if not contained, could be harmful.
After the fuse is cut, trim 1/4″ off the black wire coming from the light bar harness. The wire’s stripped end should then be inserted into one of the fuse’s terminals. Last but not least, connect the red wire from step 2 to the opposing terminal.
Step 4: Make Sure Your Grounds Are Good
You must make sure your grounds are spotless and corrosion-free. Testing both the ground wire on your toggle switch as well as the ground wire on the light bar harness (the black wire) is part of this process.
If one or both of them fails the test, sand it with sandpaper or scrape the coating off with a knife until the shiny metal is visible. Now use solder and heat shrink tubing to connect the ends of the remaining red wire to the exposed metal.
The black wire from your light bar harness should now be attached to the toggle switch’s back with one end of the wire.
After it is soldered, wrap it in heat-shrink tubing and seal it with heat! When heating the tubing, make sure that no moisture enters. You should now take the other end of the black wire and fasten it to any exposed metal on the vehicle.
Step 5: Wire The Switch Itself
Toggle switch wiring to the light bar is now required. On your dash or center console, first, decide where the toggle switch will go. After finishing this, keep in mind that you won’t be able to use the cigarette lighter jack any longer.
As soon as you’ve decided where to mount the toggle switch, take two pieces of electrical tape and secure one end of each red and black wire that comes from your dash.
Make sure they are just long enough to reach the toggle switch’s two terminals without going too far. The next step is to connect the red toggle switch wire to one of the F-labeled terminals on the new toggle switch for the light bar. Next, join the black wire from the light bar harness to the switch’s opposing terminal.
In order to prevent them from interfering with other components in the console or obstructing access to other areas under your hood or dash, secure both wires coming from your dash with one last length of electrical tape. If you’d prefer, you can also use zip ties. This step in the process of wiring a light bar to a toggle switch is essential.
Step 6: Mount Your Light Bar Toggle Switch
Put your freshly wired toggle switch into its mounting location and secure it with the nuts that come with every toggle switch kit. Once mounted, make sure to cinch down any protruding wires by wrapping them around or tying them together with a zip tie or wire loom.
Step 7: Test Your Toggle Switch
It’s time to test out your new light bar toggle switch now that everything has been mounted and wired! Once your car is running, raise the toggle switch to turn on the power for your new accessory.
If you don’t check all of your connections for tightness, your LED light strip should glow brightly. Recheck them, and if they are safe, gently pull on the wire while applying a little more heat to the solder connection.
Try turning the toggle switch off and on again after making sure that all of your connections are safe or have been resoldered, but keep in mind that it needs to be held down for three seconds before it will turn off again.
This guarantees that you won’t unintentionally turn it on every time you encounter a bump. If this doesn’t work, double-check your work and check the installation as a whole for any loose wires or connections that were overlooked.
Step 8: Take Pleasure In Your New Accessory!
You have a few choices now that your light bar toggle switch is finished. You can wire multiple switches together so that each accessory has its own turn-on/turn-off button, or you can connect the switch to an additional power source.
You will need a resistor wired in line with the accessory’s positive wire returning to your battery-positive terminal when connecting to a 12v power source.
The amount of current your LED light strip draws and how much voltage it needs to draw from your battery (typically 2A) will determine the value of this resistor.
If you’re unsure, opt for a 100 ohm, 1-watt setting. Most switches only need one resistor, but if not, keep adding more until there is no longer any dimming or flickering with each additional switch. You can connect a light bar to a toggle switch using the steps below.
Precautions
- Make sure that every connection is encrypted.
- To avoid short circuits, tape any exposed wires.
- To avoid short circuits, properly insulate the toggle switch’s back and tape over any exposed wires.
- At the breaker box, turn off the power to your switch.
- Check to see that all connections are insulated.
- Restart the switch’s power and check your work.
How Do I Run A Light Bar Wire?
Finding a mounting location for the light bar is the first step. Prior to hitting anything, be sure to drill holes. You’ll need to put the screws in after the bar is attached. Use zip ties to fasten the wire once it has been installed.
To keep the light bar in place, you can also use specialized washers. Remember to cover your eyes with protection. Use bolts and nuts to mount the light after that. Use other fasteners rather than self-tapping screws.
To begin installing a light bar, take out the fuse from the battery of the car. Afterward, join the two wires coming from the light to the switch. Another option is a remote switch. You can begin mounting the LED light bar after you have finished attaching the wires.
The mounting brackets must be located before you can mount the LED light. Next, fasten the lights to the car using the included hardware. To avoid a loose connection, make sure to tighten the screws.
Next, make sure the mounting location is suitable. A location where the LED light can be mounted is required. In order to connect the wires to it, you’ll also need to drill holes in the ceiling or wall.
Use the supplied hardware and optional mounting brackets if you don’t want to drill holes in the wall. Sparingly tighten the screws. The light bar can then be installed.